
The Anaconda distribution of Python packs a terrific quite a few libraries and applications for details science and scientific computing under a one roof. Its enchantment goes outside of scientific variety crunching, while. Anaconda is also useful as a basic objective Python distribution.
But Anaconda arrives with its share of snares and subtleties. What if you are utilizing Anaconda alongside other Python distributions, and you really do not want them stepping on each individual other’s toes? How do you combine Anaconda correctly with your other Python tooling, like IDEs? And if you come to a decision you just want to use normal Python, how do you eliminate Anaconda devoid of breaking just about anything else?
In this article, we’ll glance at how to set up and do the job with Anaconda alongside typical versions of Python on the exact same procedure. This article assumes you by now have some variation of Python put in and you have a simple performing awareness of Python ahead of finding started. Take note also that most of the steering listed here pertains to working Anaconda on Microsoft Windows.
Setting up Anaconda with other Pythons
When you run the Anaconda installer, you won’t be greeted with a terrific quite a few alternatives. But the several alternatives you are offered with make all the distinction when finding Anaconda to coexist with other Python installations.
The first option value transforming is in the “Select Installation Type” menu, exactly where you choose between setting up Anaconda for Just Me or All People. If you are on a laptop or computer exactly where you have admin privileges, picking out All People would make life a terrific deal less difficult, so decide on that option if you can. If you choose Just Me, the default selection is a subdirectory in your user profile, which may be a minor harder to obtain by default, but is still accessible as lengthy as you know the path.
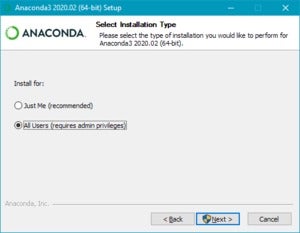 IDG
IDGOpt for the All People set up option if attainable, as this will permit you much more flexibility in phrases of exactly where to place the Anaconda directory.
On the subsequent menu website page, you are going to be specified the opportunity to adjust the directory exactly where Anaconda is put in. To make Anaconda conveniently accessible, place it in a directory (exactly where you have compose permissions) that is as large up on the travel as attainable. For occasion, on my procedure, I have the D: drive reserved for apps, so I use D:Anaconda3 as my Anaconda set up directory. You may not be capable to use a directory off the root of a travel if you are setting up as Just Me, but the simpler the path to Anaconda, the better.
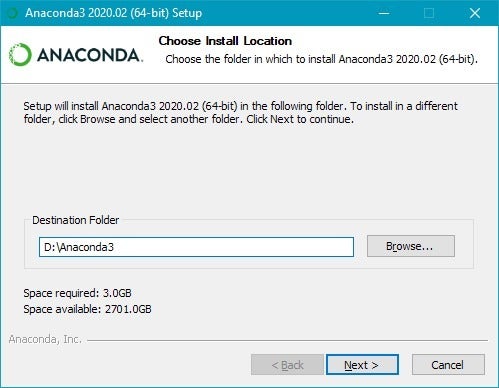 IDG
IDGUse an set up directory that is as shut to the root of your travel as attainable, for the sake of producing its path easy to obtain.
Here’s the huge reason you are going to want an conveniently accessible path: When you set up Anaconda to co-exist unobtrusively with other Python installations, you may have to have to manually specify the path to the Anaconda interpreter, because it may well not generally be car-detected, and because (by style) it won’t be in your system Route. The less difficult it is to obtain, the less headache later on.
On the subsequent installation display, you are going to be offered with two alternatives: “Add Anaconda3 to the system Route environment variable,” and “Register Anaconda3 as the procedure Python 3.7.” Uncheck both options. The first helps prevent current Python installations from possessing their Route references limited-circuited by Anaconda. The 2nd keeps your current Python installation registered as the default interpreter in the Windows Registry.
 IDG
IDGUncheck both of these Highly developed Selections to be certain that Anaconda doesn’t disrupt any current Python configurations.
End the rest of the set up ordinarily.
Using Anaconda virtual environments in a command line
As soon as you’ve completed Anaconda setup, you are going to have to have to configure command-line entry to your Anaconda environments. This can be challenging because of the way Anaconda’s atmosphere procedure will work: For Anaconda to do the job adequately, it has to activate at minimum 1 atmosphere, this kind of as the foundation environment. Just launching Anaconda’s python executable doesn’t do this.
Anaconda supplies some shortcuts to launching shell classes with the foundation environment activated. For occasion, in Windows, an Anaconda PowerShell Prompt shortcut appears in the Begin menu immediately after you set up Anaconda. Simply click this shortcut, and you are going to launch a PowerShell session with the foundation environment activated.
What if you really do not want to use the shortcut, but just want to result in activation in any PowerShell occasion you come about to be in? This is trickier, because you have to execute the exact same activation routine made use of in the shortcut.
You can do this by way of a .ps1 script with the following line (assuming Anaconda is in D:Anaconda3):
& 'D:Anaconda3shellcondabinconda-hook.ps1' conda activate 'D:Anaconda3'
Spot that script somewhere in your Route, and you are going to be capable to activate Anaconda manually from any PowerShell session.
Using Anaconda virtual environments in development applications
Most IDEs with Python assist right now are intelligent enough to figure out the existence of an Anaconda installation and any virtual environments put in. For occasion, Visible Studio Code’s Python plug-in will do this, even if the system Route isn’t configured to position to Anaconda.
Now the undesirable information. Some IDEs, which include Visible Studio Code, really do not combine elegantly with Anaconda’s atmosphere activation procedure. As a consequence, if you have PowerShell chosen as the built-in terminal shell host, the IDE just can’t activate an Anaconda atmosphere when you open the built-in terminal.
Fortunately, there is a workaround for VS Code. Edit the .vscode/configurations.json file for your venture, and include the following placing:
"terminal.built-in.shellArgs.windows": "-ExecutionPolicy ByPass -NoExit -Command "& 'D:Anaconda3shellcondabinconda-hook.ps1' conda activate 'D:Anaconda3' ""
Take note that if your path to Anaconda is unique, you are going to have to have to modify the line above appropriately try to remember to escape backslashes for Windows paths as in the above.
Now, when you kick open the built-in terminal, the first instructions passed to it will be the activation script for the Anaconda atmosphere. You can modify this further more to activate a venture-precise virtual atmosphere if required.
Removing Anaconda
If you haven’t set Anaconda as your default Python installation, then uninstalling Anaconda utilizing its crafted-in uninstaller shouldn’t bring about any difficulty. Other Python installations must keep on being untouched and must still do the job.
If you allowed Anaconda to adjust your Route, go by both your user profile Route and your system Route and eliminate any Anaconda-relevant entries.
Eventually, it is generally very best to eliminate Anaconda immediately after executing a total reboot, or at minimum a logout/login, to be certain that no cases of Anaconda are working. Also make absolutely sure you really do not have just about anything car-launched in your user profile, like a track record activity, that operates Anaconda. Normally the removing procedure may balk.
How to do much more with Python
Copyright © 2020 IDG Communications, Inc.